
MEP002A, MEP003A, Support and Troubleshooting
Re-energizing Dead Generators
Two methods for field-flashing generators, one using an existing 110 volt source, one using an electric drill – by End Times Report
Home generators in storage can “go flat” or lose their magnetism. Then they will not produce electricity, even though the small gasoline engine turning them is running just fine. There is a simple way to fix that, however. Large generators (like hydro power units) lose their magnetism very quickly: that is the reason Gary North says that if the grid goes down completely for 2 weeks it may well stay down: the power needed to re-energize the generators might not be available. It takes electricity of the correct voltage and frequency to reestablish the magnetism in the generator to produce electricity.
As many people now have generators in storage and may not use them until the “normal” electric grid is well and truly trashed, knowing how to get a generator re-magnetized could be very handy information.
First some basics in electrical connections involving household wiring. (Forget color coding for 12 volt DC systems — that is different, and it is easy to get confused.)
The color coding scheme in AC wiring, stipulated by the National Electrical Code is:
With 110 VAC house wiring, the white wire is neutral, the green wire is “ground,” and the black wire is “hot,” carrying the electricity.
For 220 volt AC wiring, Black and Red should ALWAYS be used as hot wires. White — ALWAYS used as neutral wire. Green (or bare) — ALWAYS the ground wire.
Got that? It is crucial!
Look at an electrical wall socket. The left “eye” is longer than the left — it is the neutral (white) socket; the right “eye” is the hot (black) socket, and the mouth is the round (green) ground socket. Cords which only have 2 wires often have the ground spade larger than the other spade, as they will operate “polarized” appliances. Light bulbs don’t give a darn which way the power flows through the tungsten resistance filament to generate heat (light), but many motors and appliances require the proper flow of electricity (polarity). And some appliances are grounded to their frame, so reversing the polarity can make the entire appliance “hot” and quite shocking (and life threatening) to touch.
It is important to know the correct arrangement of electrical flow because generators MUST have the correct polarity. When they lose their magnetism they are in a neutral state, so it is entirely possible to energize them in reverse — to reverse their polarity. You don’t want to do that, and it is easy to avoid.
Field Flashing Using a 110 volt Source
To re-energize a generator it must be fed electricity at the correct voltage and cycle rate while it is running. This means power must be available from household power or a borrowed generator. Most generators are 110 VAC 60 cycle, a few are 220 VAC 60 cycle, and some have dual 110 VAC 60 cycle armatures and windings (which when combined produce 220 VAC). But as all of them have 110 VAC receptacles, they can be energized in exactly the same manner.
A device must be built to connect the power source to the dead generator. Each end must have 3 wire male plugs, two wires of 12 to 16 gauge about 6 feet long, and 3 light bulb fixtures are required. The white wire is connected from the right side (holding it) or left side (looking at face) of the male plugs. The positive (black) wire must have 3 light bulb fixtures wired in series, so electricity flows through each light bulb from one end to the other. This is most easily accomplished by installing 3 porcelain light fixtures on a board and connecting them in series, but any expedient method that does not short out the wires may be employed in an emergency. Put 60 watt light bulbs in each fixture.
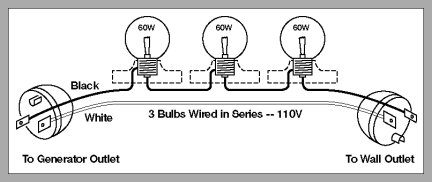
NOTE: THE POLARITY IN THE ILLUSTRATION ABOVE IS REVERSED. The black wire should go into the RIGHT SIDE plug on each end, not the left side as shown. The white wire goes uninterrupted from the LEFT plug blade to the other end on the LEFT side.
There is no need for a 3rd (green) wire in this arrangement: 3 wire male plugs are used to simplify getting the polarity correct when under duress and pressure, nothing more.
You will remember that wall sockets are “hot” and have female connections, and when you plug in an appliance or cord that all exposed connections disappear or are covered. That is to avoid the hazard of a self-induced hair raising experience known variously as “electric shock therapy” or electrocution. But the device you have just constructed has male plugs at both ends! Obviously caution is mandatory here, and things must be done in the correct sequence. But there is no alternative to this method that I know of, so you simply must be careful, keep the rug rats away, don’t stand in a puddle of water, and tell the spouse to pray instead of scream.
Fire up the engine on the dead generator and warm it up until it runs smoothly with the choke off: it isn’t under load yet, but it will be. Then fire up the borrowed generator. Plug your contraption into the dead generator, then into the spare generator or household current. The three 60 watt bulbs will start flashing: when they are perfectly in sync, carefully pull the plug from the spare generator, then the other generator which has just been re-energized. DO NOT TOUCH THE EXPOSED ENDS OF THE PLUGS – THEY ARE HOT!
Using a voltage tester, you will find the “dead” generator is now putting out 110 VAC power AT THAT SOCKET. If you have a 220 VAC generator, test the other 110 VAC socket: if it is dead, energize it in the same way as outlined above. Then both 110 volt armatures will be putting out 110 VAC 60 cycle power in sync, and combine to produce 220 VAC as well.
Yes, the system described above works, and works well. Using this technique will enable you to salvage a useless generator at very little cost. And done with care it need not be a hair raising experience — quite handy for those of us lacking same.
Have I done it? You bet. I bought my generator back in 1974 when building a cabin in the woods of Western Oregon (The “back to the land” hippies found us already there!). But in the early 80’s I didn’t use the generator for awhile (got soft), and it lost its magnetism. So I did it, and it works well to the day the engine died in 2004. It simply wasn’t worth rebuilding the engine, as those old engines were designed to run on leaded gasoline. So I replaced it with a 3,000 watt generator and built a cart to move it around.
There are other uses for short extension cords with male plugs on both ends: they must be home built, used with care (and hidden from OSHA), but they can be very useful. For example, I modified the circuit breaker box on my well pump by adding an extension cord on 12-3 wire to a standard wall socket in a normal outlet box. But I connected the extension cord to the BOTTOM side of the circuit breaker — to the pump wire connection. When the circuit breaker is “on” and power flowing, I can plug in a clamp light with a 150 watt light bulb and prevent the pump from freezing.
But if the power goes out, I can flip the circuit breaker off, thereby isolating the pump from the house wiring. I can fire up the generator, plug one male end into the socket connected to the circuit breaker box, plug in the other male end to the generator, and power the well pump. And I don’t have the fear of electricity flowing backwards past the circuit breaker box and up the line. When I want to turn off the pump, I pull the plug from the generator FIRST.
ANOTHER WAY TO EXCITE THE COILS AND REESTABLISH MAGNETISM
A reader sent me this link and method. I have not used this method myself, but it has great applications for the future given that it does NOT require the use of electricity from another source. Another reader told me he tried it and it worked!
I always give credit where due. A reader sent me the link, the link is shown, and the information supposedly came from Briggs & Stratton. Miles
Field Flashing Using an Electric Drill
This tip comes from the Briggs & Stratton Customer Education Department. As an alternative to flashing a rotor winding with a battery applied to the brushes, an electric drill may be used. Follow these steps to flash the generator:
- Plug the electric drill into the generator receptacle. (Cordless drills do not work)
- If the drill is reversible, move the direction switch to the forward position.
- Start the generator
-
While depressing the trigger on the drill, spin the drill chuck in reverse direction. This will excite the field and the generator will now produce electricity. If spinning the chuck one direction does not work, try spinning the chuck in the other direction as you may have the reverse switch positioned backwards.
Use caution not to get your hand or other materials caught in the chuck. As soon as the field is excited, the generator will produce power and the drill will turn on.
The reason this works is because the electric motor in the drill will act as a small generator when spun backwards. The magnets in the drill’s motor induce a voltage into the motor windings, which is fed back through the trigger, cord and into the generators receptacle. From there it goes into the power winding of the stator. The voltage going through the power winding creates a magnetic field, which is intensified due to the iron core of the stator laminations. The rotor intersects this magnetic field as it is spun past the power winding, thus inducing a voltage in the rotor winding. Once current flow is present in the rotor winding the rotor has been flashed.
If flashing the field does not make the generator work, you may have additional problems, besides a lack of magnetism in the rotor. Further testing will be needed. Hopefully, this will give a simple way to field flash your generator if needed.
Yes, you can try this if the field needs to be energized. Keep the crank button in the crank position for an extra 20 or so seconds. You can look at the free manuals here as well for the MEP016B.
Hey guys I have a MEP016B gen set and the engine purrs like a kitten (well a noisy one) but it will not produce any electrical power. Can I use this procedure on this model to excite the fields? Does anyone have test procedures on aMEP016B. I would greatly appreciate thanlks.